Part Two: Iron on veneer on MDF cabinets
If a black textured finish is not your style (see part one), keep on reading as we delve into an option that you may have previously considered a desirable but more specialist finish. In part two we show you how to achieve the popular real wood veneer finish. In the accompanying photos, you’ll notice an LSK M3 mini speaker kit being used as an example.
Usually, veneering is a specialist process that requires considerable skill. If you’ve already had some insight into veneering, you may have formed the opinion that it is out of your reach to produce a flawless result. Here we present a more accessible veneer option that offers the novice the potential to achieve a desirable result. The key with our method is to use an iron on veneer where each sheet already contains heat-activated adhesive. With due care, an excellent finish is within reach.
First, we’ve listed below the tools you’ll require to complete the process. Notice that some tools are optional while the necessary tools are easily accessible to everyone (image 1).
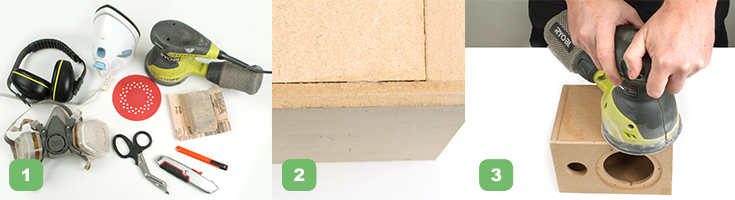
Tools required:
- iron on veneer
- iron
- sand paper (120 grit)
- sanding block
- orbital sander with 120 grit paper (optional)
- ear muffs & dust mask (if using sander)
- masking tape
- straight edge
- cutting knife
- scissors
- cardboard
- filler (if required)
- baking paper
- rotary cutting tool (optional)
Step 1: sanding and filling
As we mentioned in part one, MDF has a waxy surface coating which should be sanded down prior to painting to ensure adequate adhesion of the veneer. In addition, during the construction process, especially where clamps have not been used, the panels might not line up perfectly. It’s in this first step that this should be resolved by sanding and/or filling.
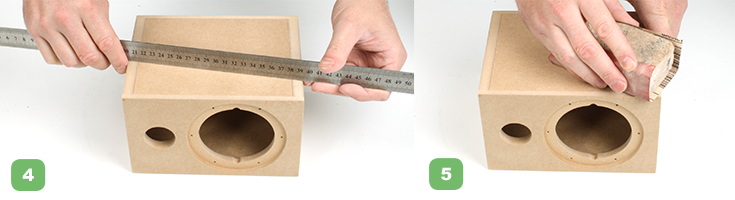
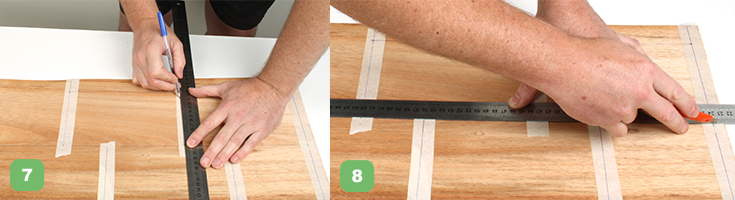
Gaps in the joins can also be present due to inadequate pressure during the construction process (image 2). Even with veneer covering, it may be worth filling these gaps, even though it is less critical than with a painted surface. If you are sanding uneven edges, don’t be deterred if you are not in possession of an orbital sander such as the one used in the photo (image 3) because a sanding block is also effective.
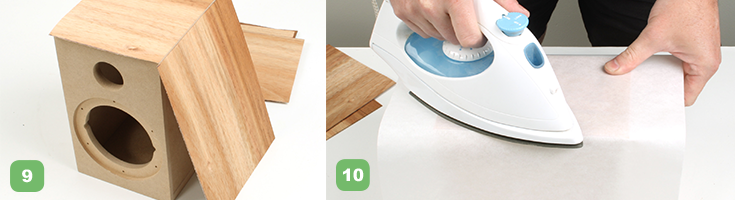
You can check the surface of your cabinet is flat by using a straight edged object such as a ruler (image 4). In particular, pay attention to the joins because the veneer won’t conform very well to sharp changes at butt joins. If the surface is already adequately flat, then you may simply sand off the waxy surface coating by hand with a block (image 5).

Step 2: choosing your veneering layout
It’s now time to decide how you want to wrap your veneer. If you’re going to use a grille with your speaker, then you may want to run the veneer so that it wraps from the sides across the top. As the grille will cover the front, you will want to pay attention to the visible edges. If there is no grille, then you may still do it the same way, or you may prefer to wrap from the front baffle around to the top. It’s a matter of personal preference. In this guide, we wrap from the sides across the top (image 6).
Step 3: cutting the veneer
Lay out the veneer and mark out the cuts you require from the measurements of your cabinet. Ensure that your measurements allow the veneer to overhang each edge by at least 5mm. The veneer shrinks in the heating process and the sheet will also move slightly, so adequate margin for error and shrinkage is required. Use cardboard to protect your work surface and cut with a sharp blade and straight edge (image 7).
It’s a good idea to use masking tape over where you will make the cuts, especially for those that are across the grain but also for those with the grain. Not only does the masking tape provide a surface you can mark with a pen, it also helps assist you in achieving a neat cut. Be aware that it’s more difficult when cutting perpendicular to the grain as the veneer can split. When cutting with the grain, the veneer may tend to cut at a different angle than desired. Ensure that you cut with multiple passes. Don’t attempt to cut all the way through at first – the first pass is to score the cutting line only (image 8).
Step 4: ironing on the first sheet
First, check that sheets will wrap correctly (image 9). The order you choose to iron on each sheet depends on the wrapping and also the edge treatment. Generally we recommend applying the back first and the front last. Ensure you follow through with Steps 4 and 5 for one sheet before proceeding on to the next.
It’s important to ensure that your work surface is free of dust and the iron is set to the cotton setting. Before beginning the ironing phase, you will need to place baking paper in between the iron and veneer. Position the first sheet carefully before placing the baking paper on top. The paper moderates the heat and avoids burning the veneer. The paper can be left out if you are careful with the application of heat.
Start in one spot and then work from there with the iron (image 10). It’s important to ensure adequate heat is applied. The adhesive on the underside of the sheet is heat activated – without adequate heat it will not reach melting point and a strong bond will not be achieved.

The surface should be hot enough that it is not easy to touch. After the entire surface is flat, check the edges. You should see a little glue oozing which confirms that adhesion has occurred all around the edge. Apply follow up pressure of the entire surface with a block (image 11).
Now check that full adhesion has occurred over the entire sheet. You can check the edges by gently pressing upwards (image 12). Be aware that the initial hold immediately after ironing, as the adhesive cools, is not very strong, so you should wait until the sheet starts to cool. Run your fingers over the surface. If there are points where adhesion has not occurred, you will hear a change in the sound of your fingers running over the veneer. If you find a lack of adhesion at any point, you can simply re-activate the adhesive by applying heat again and repeating the process.
Step 5: trimming the edges
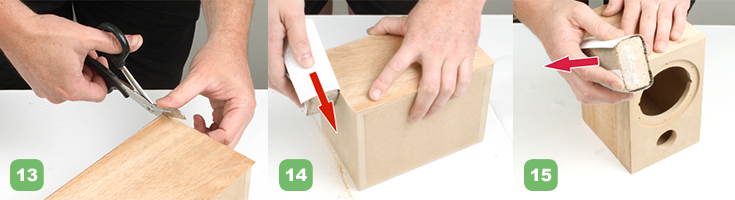
Each time you apply a sheet to one side, the edges should be trimmed shortly after. Allow enough time for the adhesive to cool down first though. Depending on the amount of overlap, you might like to trim it back with scissors or tin snips. Care is needed to avoid lifting the veneer at the edges. Shown in image 13 is an example of how not to cut the veneer.
It might seem harmless enough, but cutting in this way will often pull up the veneer at the edge and result in the need for repair. The correct way to cut a veneer edge places the top scissor blade horizontal, in constant contact with the veneer. Only the bottom scissor blade should rotate. Use the thumb to press the top down to ensure contact is maintained.
Once you get fairly close to the edge, sand paper on a block can be used. It’s important to sand in a direction that will not lift the edges or cause damage (image 14). As shown, sand at an angle but stop short of the corner, where the direction shown would cause the corner of the veneer to splinter away. At the corner, ensure you sand in the opposite direction (image 15).
Paper with a grit of 120 is recommended. A coarser grit will get the job done quicker but at the risk of damage. Another good alternative is 180 grit. However, be aware that a finer grit will take longer. Steps 4 and 5 are to be repeated for each sheet. The order we used in this guide:
- Back
- Bottom
- Side – right
- Top
- Side – left
- Front baffle
Step 6: creating the terminal and driver cut outs
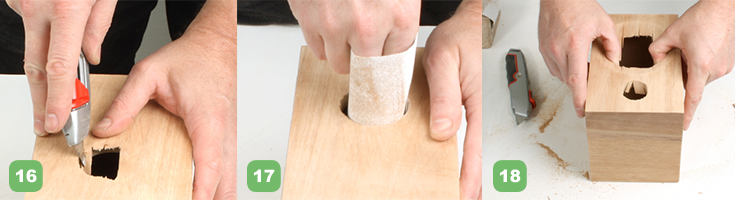
Now we need to cut holes in the veneer where the speaker components will be inserted. With a blade, make a hole in the middle of all driver, port and terminal cut outs (image 16). The terminal cut outs are not so critical as the edge is not seen, however it’s still preferable to do neat work here. After most of the cutting is done, sand paper does the rest (image 17). Greater care is warranted on the driver cut outs that will be seen (image 18).

Aim to get as close as you can to the edges to minimise sanding (image 19). Here you may like to use a blade. Sanding the driver cut out by hand is shown in image 20. You may wish to trim with a rotary cutting tool as these get the job done quicker but be aware that this process is more likely to cause damage, so greater skill and care are required (image 21). The final result is pictured in image 22.

Some extra tips:
- Stain can be applied as a next step, but often a clear varnish gives a more natural result.
- The colour of the veneer will change after varnishing.
- Consider using a grain filler if you want to achieve a smoother finish.
- A clear satin varnish is the best all round option.
- High gloss varnishes tend to expose minor flaws.